
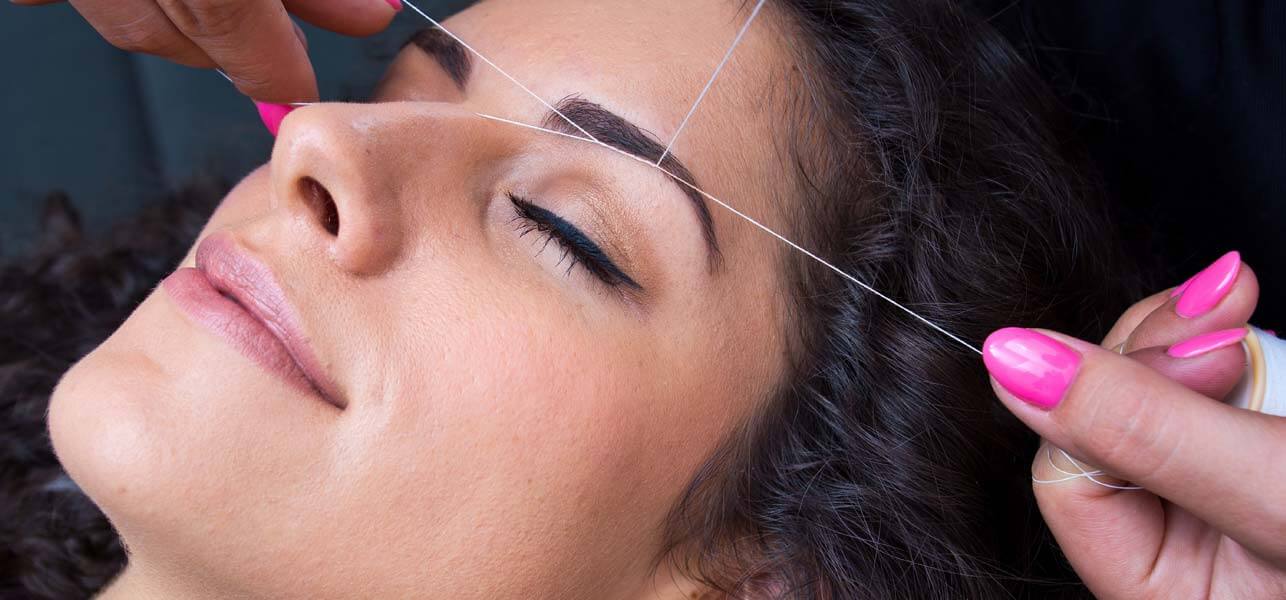
Perfect pair of eyebrows says a lot about its owner! They define the face and add beauty to it. Eye brows should always be groomed keeping in mind the face shape, age and preferences. But with busy schedules and hectic work hours, we hardly have time to go to the parlor to get our eye brows done. Even for those who have time, wouldn’t it better if you could do your eyebrows at home? If you think you will need a lot of skills for it – think again because with a tiny bit of practice, you will master the art and can do your own and anyone else’s eyebrows in a jiffy.
Before threading eyebrows, you need to determine which eye brow shape would suit you the most and to determine this you need to know which face shape you have. The face shape plays a very important role in determining what type of brows would suit you.
Here’s a quick way to determine how you can go ahead with threading eyebrows:

Eyebrow threading shapes
Round shaped face:
If you have a round face shape, then the eyebrows threading should be such that the brows are arched and are as high as possible. This trick will make the face seem less full and longer.
[ Read: Eyebrows for Round face ]
Oval shaped face:
Oval face shape is the most desired face shape and it is also preferred as this face shape that can carry any style with ease. So there is no worry for those who have it. It is better to keep the brows medium thick and keep the arch slightly sharp.
Square shaped face:
If you are square face shaped, then you have more or less the same width at the forehead as well as the chin. So the basic goal when doing eye brows is that you need to keep the arch high but not very high. Keep a slight curve and the thickness medium to achieve the best look for your face shape.
If you have a long face, then you will have to realize that as the face is already long we need to make it appear a bit shorter. The best way to create the illusion of a shorter face is to have a flat brow, with slight downward curve or you may just keep it plain straight. This will help in making the face look shorter. The flat brow will make the face appear less long and more proportionate.

If you have a diamond shaped face, then you will have to keep in mind that your forehead is the widest part of the head. For this we need to make it appear less obvious. Create an ‘S’ shaped brow which has a slight upward curve at the beginning. Keep the arch high but not unnaturally high.
A person with a heart shape face has a pointy chin, so the main aim should be to distract the attention from the chin and towards the eyes. To achieve this distraction we need to keep the eyebrows rounded. There is no need to create a sharp arch. Keep it as rounded and smooth as possible to balance the pointed chin.
Now that you have decided the shape of the brow, some additional tips for threading at home:
- You will be better off if you ditch that magnifying mirror. You should just use a regular mirror and choose either a naturally lit room or a room with bright light. Using a well-lighted setting will help you see all the hairs easily without you bending over to the mirror. Also after a bit of plucking do step back and check the results from far. This is very necessary as this will prevent you from overdoing the threading. You do not want to be stuck with uneven brows.
- For easing the process of threading, you should have a guideline ready of the shape of the brow. If you want to shape your brows differently then use a creamy pencil to outline the brows and mark the desired shape. It’s best to use a white kohl pencil or a black creamy pencil which should work fine. It is best to avoid the ones having high amounts of wax.
- It’s better to thread after you have a hot shower/bath. The hair become softer and can be pulled out with minimum pain and effort. So take a shower and you may also do this before you go to sleep at night.
- If you are very sensitive to pain then teething gel or a local anesthetic cream might be the solution. Apply a bit of cream on the brows, a few minutes before starting the threading.
- If you feel pain after threading or the area becomes red, then use an ice cube to soothe the place or apply aloe Vera gel.
- Dust a bit of powder on the area of threading.
You will need the following to do the threading:
- Some threading Thread. You can buy it online at Medplusbeauty.com or buy it from the local beauty parlor or beauty supplier. It is priced very reasonably and a roll of 300 meters of thread will cost you around 30Rs. This roll if used by a single person will last you more than a year. So that is a great way to save money. Buy cotton thread as it is hygienic and easy to use.
- A smooth pencil to mark or determine shape. Use any color you like. For example use white or black/ brown.
- Body powder and a puff to apply it.
- A pair of scissors
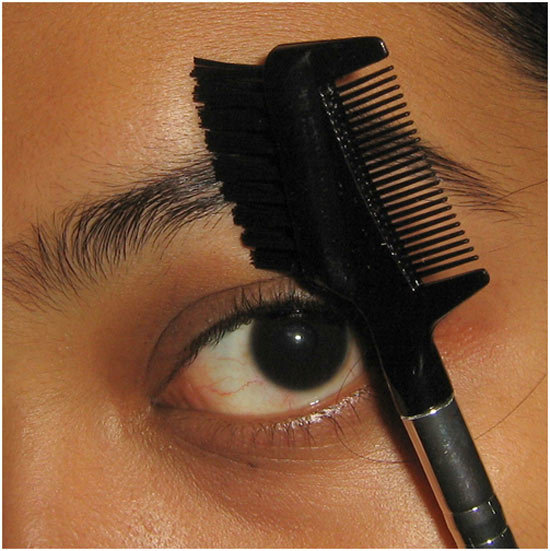
- A brow brush
- Some brown shadow/ brown brow cream/powder to fill in the brows
How to Eyebrow Threading
Step 1:
Sit before a large mirror in a comfortable position. The area should be well lit up so that you can see the hair easily. The more comfortable you are, the easier the whole process will be.
Step 2:
Take the pencil test and determine the starting point, the arch and the ending point of your brow using the following method.
- First take a long pencil or a thin brush and line it along the side of the nose. The brow should start right above the tear duct. Point the spot using your creamy pencil and mark it out.
- Now take the pencil/brush and with one end on the side of the nose try to make a 45 degree angle with the nose. The invisible line should go right through the pupil. The spot where the pencil hits the brows will be the highest spot for the eyebrow and will determine the arch shape and position.
- Now keep the pencil’s one end at the nose line and the other end of the pencil along the outer corner of the eye. The spot where the pencil will meet the brow will be the ending position of the brow.
So when you have the three determining factors ready, join the three spots using your pencil.
Step 3:
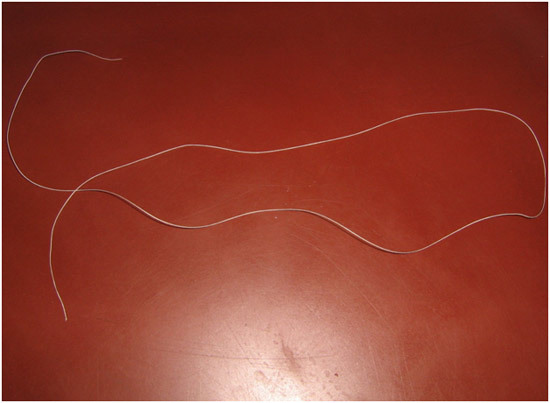
Take 2ft of the thread from the roll. This is the length of the thread we need for tweezing. Hold the roll in one hand and with the other hand take double the length of the distance we mentioned before and cut the thread.
Step 4:
Make a small knot and secure the thread which should look like this.
Do not keep the ends loose and hanging, if there is excess thread cut it with the scissors. Don’t worry as this will become much easier when you have done it several times and then you will need very less time for preparation.
Step 5:
Dab some of powder on the brows using a powder puff. Just apply very little powder.
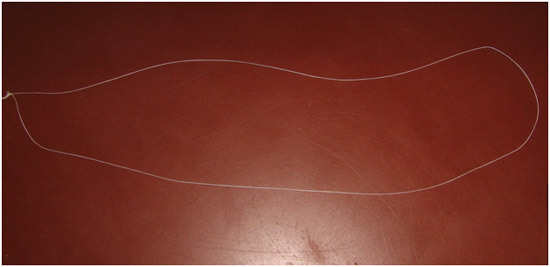
Step 6:
Now take the knotted side of the string in one hand and the other side in the other hand. Keep the hand (with the knot) at a stagnant position and wind the other end. Wind it 10 times or more and the winded portion is the middle is what will help us thread the excess hair.
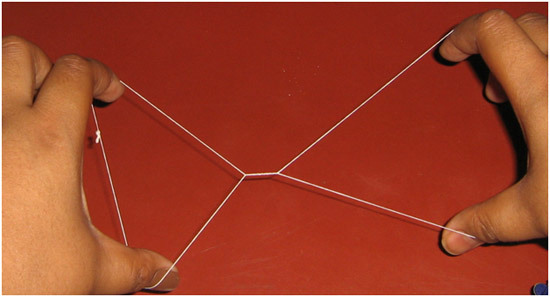
Step 7:

Keeping your fingers away from the face, take the winded portion of the thread and place it on the area with the unwanted hair. Then keeping the fingers on one hand closed open the fingers on the other hand. The winded portion will move and trap the hair.
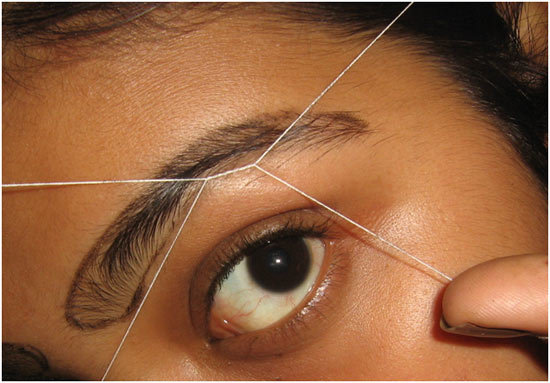
Then with the opposite movement, open the previously closed finger and close the other one remove the hair from the roots. Slightly pull the hairs against the growth. The hairs will come out easily with this movement.
Step 8:
Keep doing this till you see the desired results. After a few pulls take a look at the mirror and only thread the hairs which are outside the line you have drawn.
After threading use the brow brush to see if the hairs need trimming. Trim the hairs if necessary.
Step 9:
Apply Aloe Vera gel/ rub an ice cube if it pains.
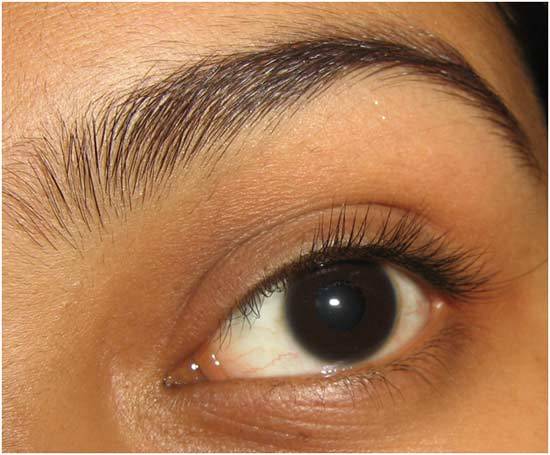
Step 10:
Now remove the lines and the powders. Then fill in the brows with some brown shadow/ brow powder and you are done.
If you feel that you are not doing it right practice on the hair on the feet as it is easily reachable. Practice makes perfect but once you get the hold of it you can easily do it any time.
I hope this article on the eyebrow threading methos helps you achieve the right eyebrow shape.
Image source: 1
Original article and pictures take http://www.stylecraze.com/articles/how-to-do-eyebrow-threading-at-home-diy-with-detailed-steps-and-images/ site
Комментариев нет:
Отправить комментарий