
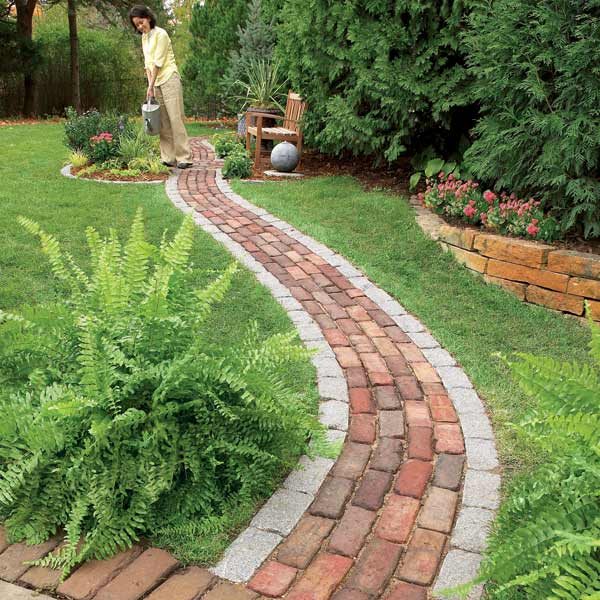
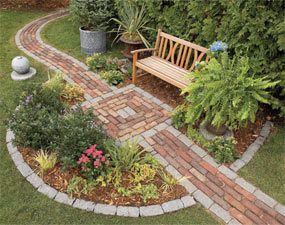
You don't need heavy equipment and a week of work to lay an attractive and durable path. We designed this one for simplicity and ease of construction. It's made from old street pavers and granite cobbles set on a sand bed. But you can substitute just about any pavers or types of stones that are readily available and fit your landscape. The stone-setting techniques will even accommodate stones of varying thicknesses. You can build this path in about two weekends using a shovel, a wheelbarrow and a few inexpensive hand tools.
In this article, we'll walk you through all the path-building details, from breaking ground to breaking the cobbles to fit tight spots. Usually the main stumbling block is making the path smooth and flat. To solve that problem, we'll show you a simple leveling technique using ordinary plastic landscape edging. With this technique, you can lay a top-notch path, even if you're a novice.
Keep in mind that we designed this path for foot traffic and other light use. Don't try to drive on it. Because the path is set only on sand, it won't stay as flat and smooth as a traditional paver walk set on a compacted gravel bed. It's ideal for narrower secondary walks in a garden or back yard, where slight imperfections and undulations add to its character. And if an edge stone gets loose from a wheelbarrow bouncing over it, you can reset it in minutes. Expect to pull an occasional weed growing up in the joints. Or if you prefer an English cottage look, encourage moss or other ground covers to grow in the joints.
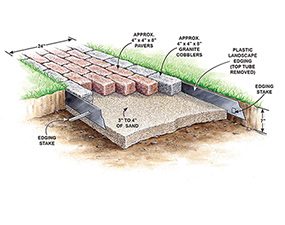
To achieve the aged, timeless look, you'll have to track down old street pavers. If you're lucky, you may be able to salvage material from a local project. Otherwise look for older materials at a landscape supplier or an architectural salvage store. You can also check the classified ads in your local paper under “Building Materials.” Expect to pay a dollar or more apiece for old pavers. The size varies but it usually takes 4.5 to cover a square foot. The granite cobblestone isn't antique; the stones were run through a rock tumbler to make them look worn. We paid a premium for these. Figure on three cobbles per linear foot of path. Use ordinary washed concrete sand for the setting bed. Figure on 1 cu. yd. per 80 sq. ft. of path. Have the pavers, cobbles and sand delivered. Use a “contractor's grade” landscape edging for the border (Photo 3). Buy it from a landscape supplier in 20-ft. strips that are stored flat. (If you gently bend each in half, you can wrestle them into a sedan with the windows open.) They usually come with stakes, but buy a few extra packs to hold the edging down better. Don't buy the edging that's coiled up in a box; it's difficult to uncoil and set smoothly.
You'll need a couple of special tools to do first-class work: a hand tamper (Photo 6) and a deadblow hammer or rubber mallet (Photo 9). You can get these at a home center. You'll also need a 3-in. mason's chisel and a 3-lb.hammer (Photo 12) to split the pavers. Then grab your yard shovels and wheelbarrow and go to work.
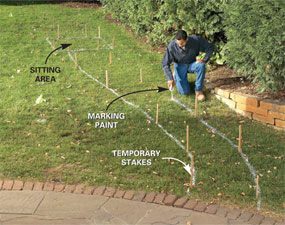
You can use a garden hose to help you lay out your path. But Photo 1 shows another technique. First dot the key starting end and center points, then connect the dots with a smooth line. Stakes work well to mark a curve, then simply connect the stakes with paint (Photo 1). Don't worry about making mistakes with the paint; your next mowing will erase them. Gradual curves work best; curves with a radius tighter than 5 ft. result in unsightly wide gaps between the pavers. Plan your path width to the full brick (Figure B), then add a few inches to the width of your excavation for wiggle room for the slightly wider spacing needed on a curve. Make your path anywhere from 2 to 3 ft. wide. Anything wider will look out of scale in a garden setting.
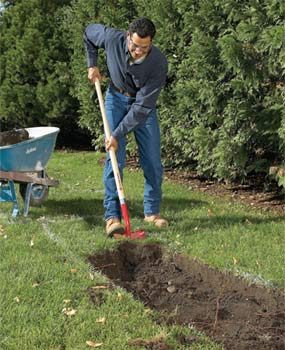
When you're digging through sod, it's always easiest to drive the shovel through the grass and push it into the excavation (Photo 2). When you're on a slope, use gravity in your favor. Start at the bottom and back your way up the hill. Use the blade of a round-nose shovel as a rough depth gauge. Stepping it almost all the way in is about a 7-in. depth. Roughly dig out the entire path, then shave one of the sides back to the paint line with an edging spade held vertically. Finally, shave the bottom flat with either shovel. You'll be amazed at how much dirt will come out of that narrow little path. If possible, find a place for it onsite by building a berm or adding soil around the house to improve drainage. Otherwise, roughly calculate the volume of soil you have to remove and rent a roll-off container for soil disposal.
Before you dig, ask your local utility to locate any buried lines. (Call 811 from anywhere in the country.) Give the company at least two days. If you have buried electric lines running out to a garage or yard light, turn off the circuit at the electrical panel while you dig. Also locate any sprinkler heads and landscape lighting and dig carefully around them.
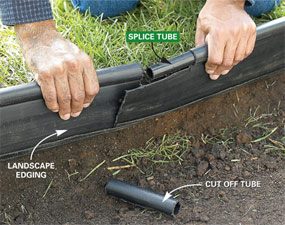
The top of the plastic landscape edging will be the finished height of your path. Set it a little higher than the surrounding lawn or garden so water will drain off the path. Set the top of the tube flush where the path meets a patio or driveway. The heavy-grade plastic edging will form a smooth, flat surface, without telegraphing the minor dips or bumps in your lawn. Most edging has a little lip on the bottom to keep it from creeping up (Photo 3). Set this to the inside of the path. With one side spiked in place, cut your screed board to the path width and use it to space the edging on the opposite side (Photo 5). Set this edging side about 1/2 in. higher or lower to encourage drainage from the path. At the 4-ft. wide seating area, allow a 1-in. height difference across the entire width.
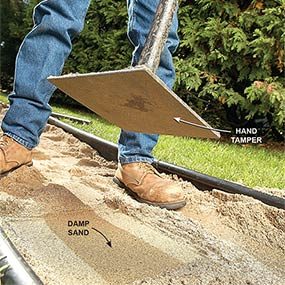
Now add sand to the excavation and compact it (Photo 6). Although a motorized plate compactor works best, a hand tamper works fine for a small, informal path like this. The sand should be slightly damp when you tamp it to help it pack. Sprinkle it with water if it's dry.
To flatten it, place the ears of the screed board on the edging and pull a ridge of sand down the path, filling in any depressions as you go (Photo 7). Work from the top of the slope downhill. Whether you remove the edging tube is purely a matter of aesthetics (Photo 8). If you don't mind the appearance of the tube, leave it on.
Figure out the seating area dimensions by roughly laying out the pattern on your driveway. Then set the sand base in the same manner as the path, by placing edging on two sides to serve as screed guides. (Use a longer screed board.) Because you'll be setting a bench on it, make the surface relatively level. Only allow a 1-in. height difference from one side to the other. Because our project was on a slope, we had to hold the edging 2 in. above the sod on one side. Then after laying the pavers, we added soil to build that edge up. Lay the pavers in staggered rows (a running bond pattern) that wraps around the sides. Start at the outside and work your way around to the middle. It'll take a bit of fiddling to get the pavers to fit. You'll have to space some pavers up to 1/4 in. apart and cut a few as well. The informal design allows for looser spacing. Sand will fill the gaps.
Original article and pictures take http://www.familyhandyman.com/diy-projects/concrete---brick/brick/build-a-brick-pathway-in-the-garden site
Комментариев нет:
Отправить комментарий