

Cute Christmas Nail Art Designs #1


For the polka dot thing, you first need to paint your nail in a matte finish, Forest green coloured nail paint and wait for it to dry entirely. Next, use dotter tools of different sizes for the various sizes of Polka dots.
The Santa face is nothing too difficult to draw either. You need to paint the lower third of your nail in a bright, tomato Red shade. Use the dottor tools for the eyes, nose and the frill of Santa’s cap. Seal everything with a top coat of clear nail varnish.
The Reindeer requires you to draw an inverted U shape followed by filling in the colour and details with fine nail art brushes.
Cute Christmas Nail Art Designs #2


The Polka dot thing is pretty easy to do. You can overlap bigger ones with smaller dots in a different colour. The Christmas tree is the tricky part here, to get the neat finish, a stencil would be a good guess. Cut out a small Christmas tree shape. Paint the nail in light Green and let it dry. Put the Christmas tree cut out in the centre. Paint the dark green shade around the stencil. Peel off the stencil then. Seal with clear Polish.
Cute Christmas Nail Art Designs #3


Use glitter Polish for the three nails. The word elf can be written using a nail art pen. The body of elf is easy to draw with the shapes required being pretty much geometrical. Use two inverted triangles for the coat and rectangles for belt and legs. Keep the width and sizes proportionate. Fill in the colours using fine brushes dipped in nail paints or even acrylic colours if you want.
Cute Christmas Nail Art Designs #4

Very easy and simple snowman nails art here. Cool Blue has been chosen as the base colour for a refreshing contrast. The snowman is super easy to draw with a dot making the snowman’s face and the oval making it’s body. Add rest of the details once, everything has dried. Seal with a top coat.
Cute Christmas Nail Art Designs #5


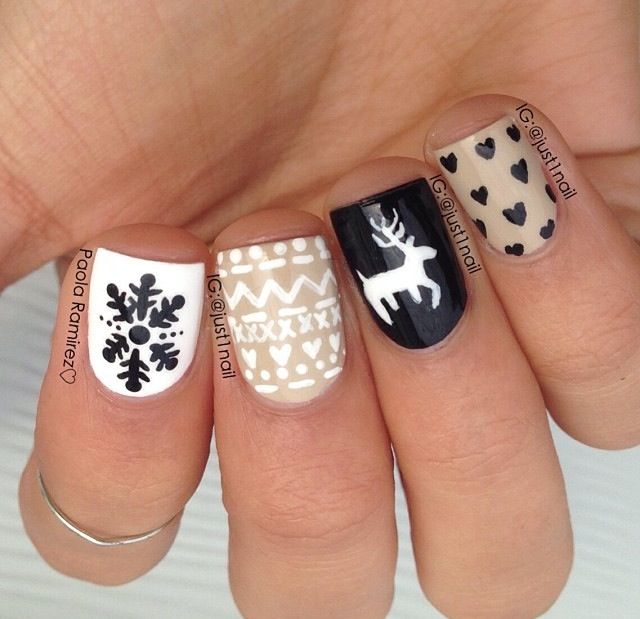
Each nail looks beautiful in its own way. The predominant colours used is very subtle and neutral. Black, White and nudes is used to create multiple motifs.
The hearts on nude base nail colour need to be drawn with a fine brush otherwise you can even use heart shaped stickers. The Reindeer is something that can be done using a stencil. The Christmas sweater knitting inspired motifs are basically done with easy geometric patterns like crosses, zig zag, a series of dashes. The snowflake design is pretty easy to do and looks like mini human cave paintings dancing around a common centre. Use a nail art pen or a brush for this.
Cute Christmas Nail Art Designs #6


This one is something that the professionals can handle the best. Paint your nails in a baby pink shade and let it dry. A darker shade of pen can be used to draw the floral motif. For the White meshwork you can either use a transparent, delicate stick on or lace dipped in White acrylic paint.
Cute Christmas Nail Art Designs #7


Snowfall on nails looks lovely. The unsymmetrical pattern of the fallen snow on different nail edges along with the polka dots depicts the snowfall quite well. The snowman is drawn by using the dotter tool with three dots overlapping each other to create the final outlines of a snowman.
Cute Christmas Nail Art Designs #8


Beautiful Christmas shades have come together here on a white base. The glitter Polish looks amazing with the dots overlapping each other. Try to keep the gradient and positioning similar to the style depicted in the picture.
Cute Christmas Nail Art Designs #9


This one looks more complicated than it actually is. Break it into steps and it shall look much easier. Start by doing the two horizontal and two vertical lines first. The Cherries come next and can be done quite easily with a dotter tool. Next, you need a fine brush to draw the diffuse form of leaves in Green with slight shading of Black nail paint. When everything is dry, seal with a clear Polish.
Cute Christmas Nail Art Designs #10


Very basic shades of Black and white along with a skin coloured nail paint has been used to draw different patterns on all nails. The motifs are very bardic ones and can definitely be achieved with a little practice and patience. To add in the details, nail art pens & stickers seem like the best bet.
Cute Christmas Nail Art Designs #11


To can achieve neat looking edges with help of a stencil and rest can well be taken care off with a dotter tool kit. The snowy Christmas night is depicted beautifully by starkling contrast between Royal Blue and White.
Cute Christmas Nail Art Designs #12


Bows always manage to loom cute. To separate out the two sections, you need to draw a bold line along the curvature of your nail edge and the either draw a bow with your nail art brush of place a stick on. The latter is no doubts easier to do. Seal With a clear nail varnish, thereafter.
Cute Christmas Nail Art Designs #13


Two different patterns of nail arts depicted here. The first one needs you to draw some very basic things like polka dots to represent the falling snow as well as a couple of overlapping dots to form the snowman. The snowflake looks pretty much like a star.
For the second nail art, you can draw the Christmas tree by drawing three overlapping triangles arranged vertically. Fill in the colour and then decorate your nail art using glitters and Studs. A pair of tweezers and some adhesive are required, too.
Cute Christmas Nail Art Designs #14


After doing the White base, this graphic / cross stitch like design is best done by using a peel off, transparent sticker for a neat finish. Better still, get it done from a nail artist who knows how to work well with thee accessories and handle the details precisely.
Cute Christmas Nail Art Designs #15


The edges are done in White and the frosted appearance is added by using either a White or a Silver glitter polish on the upper half of the nail. The test if the design can be created by using a nail art pen. Add the rhinestone at the very end.
Cute Christmas Nail Art Designs #16


Christmas tree embellishments look nothing less than adorable on your nails. Paint the nail white and draw the decorations using a big sized dotter tool. The embellishments on the balls can be using a glitter nail art pen. For the Christmas tree leaves draw a central, straight line with lateral extensions arising from it in Green colour.
Cute Christmas Nail Art Designs #17


Arrange the polka dots in various shades of Green in form of a triangle to depict the Christmas tree. The star in the top can be done in Red. To increase the life of your nail art, seal with a clear coat of nail polish.
Cute Christmas Nail Art Designs #18


Paint the upper half of your nail with a turquoise Blue glitter Polish in aslant, if possible. Use the nail art own to draw the snowflakes. Use a coat of clear nail paint to seal everything.
Cute Christmas Nail Art Designs #19


The pictures are pretty much help explanatory. You need to deposit nail paint in form of dots and then elongate the dots. One colour overlapping upon the other ends up creating a beautiful lace pattern.
Cute Christmas Nail Art Designs #20


The Red and Black checkered nail paint base with beautiful Golden bow embellishing your nails looks awesome and pretty. However, only a professional nail artist can do it neatly and precisely for you.
Cute Christmas Nail Art Designs #21


The White nail base with a Silver coloured, symbolic Christmas tree looks super easy to do and impressive, none the less.
Cute Christmas Nail Art Designs #22


This nail art looks more like a Blackboard drawing. The base colour chosen is a perfect matte finish Black while the White nail art pen gives pretty much the effect of a Chalk. Simple Christmas themed figures are drawn on nails for simple yet beautiful result.
Cute Christmas Nail Art Designs #23


Awesome looking and perfectly painted Hot Red nails along with the peter pointer finger as the accent nail looks cute. The accent nail has been decorated with snowflake motifs along with a couple if nail art studs.
Cute Christmas Nail Art Designs #24


This nail art is a compilation of all the styles we have already talked about and has been done very smartly by including the polka dots, the frosted appearing glitter nail paint on upper half of nails and the snowman figurine. It looks like a perfect Christmas scene outdoors.
Cute Christmas Nail Art Designs #25


After painting the base of your nails in aflutter Blue shade, you can draw the snow hanging from what seems like the entrance of a snowy cave. The penguin figure can be drawn in a nail art own first followed by filling in the colours. Another easier way out could be using a penguin sticker.
Cute Christmas Nail Art Designs #26


After painting the nails in White and the edges in Red, you can do the detailing and holly leaf pattern with a glitter nail art pen. The Red dots can well be done with a dotter tool.
Cute Christmas Nail Art Designs #27


The snowman in this nail art is way too excited for Christmas celebrations. The figurine of snowman needs to be drawn with a fine tipped,nail art own/ marker and then the suitable colours and details can be filled in.
Cute Christmas Nail Art Designs #28


This is a classic example of nail art using takes where glitter nail polish, nail art tapes and probably a stencil to draw the Christmas tree have been used. For the star, a Golden sticker has been used. This needs skill and patience but can be a diy.
Cute Christmas Nail Art Designs #29


The base has been done in deep Mauve shade and the edges done in Grey colour. The White pattern has been created with using Multiple of dots overlapping each other in a spike like pattern.
Cute Christmas Nail Art Designs #30


Against a White base colour, the glitter nail art owns and the Rhinestones really stand out and look magnificent. The work however is only a professional’s cup of tea!!
Original article and pictures take http://christmas.365greetings.com/christmas-party/30-most-cute-christmas-nail-art-designs.html site
Комментариев нет:
Отправить комментарий