

1. Face brushes come with pretty specific purposes.
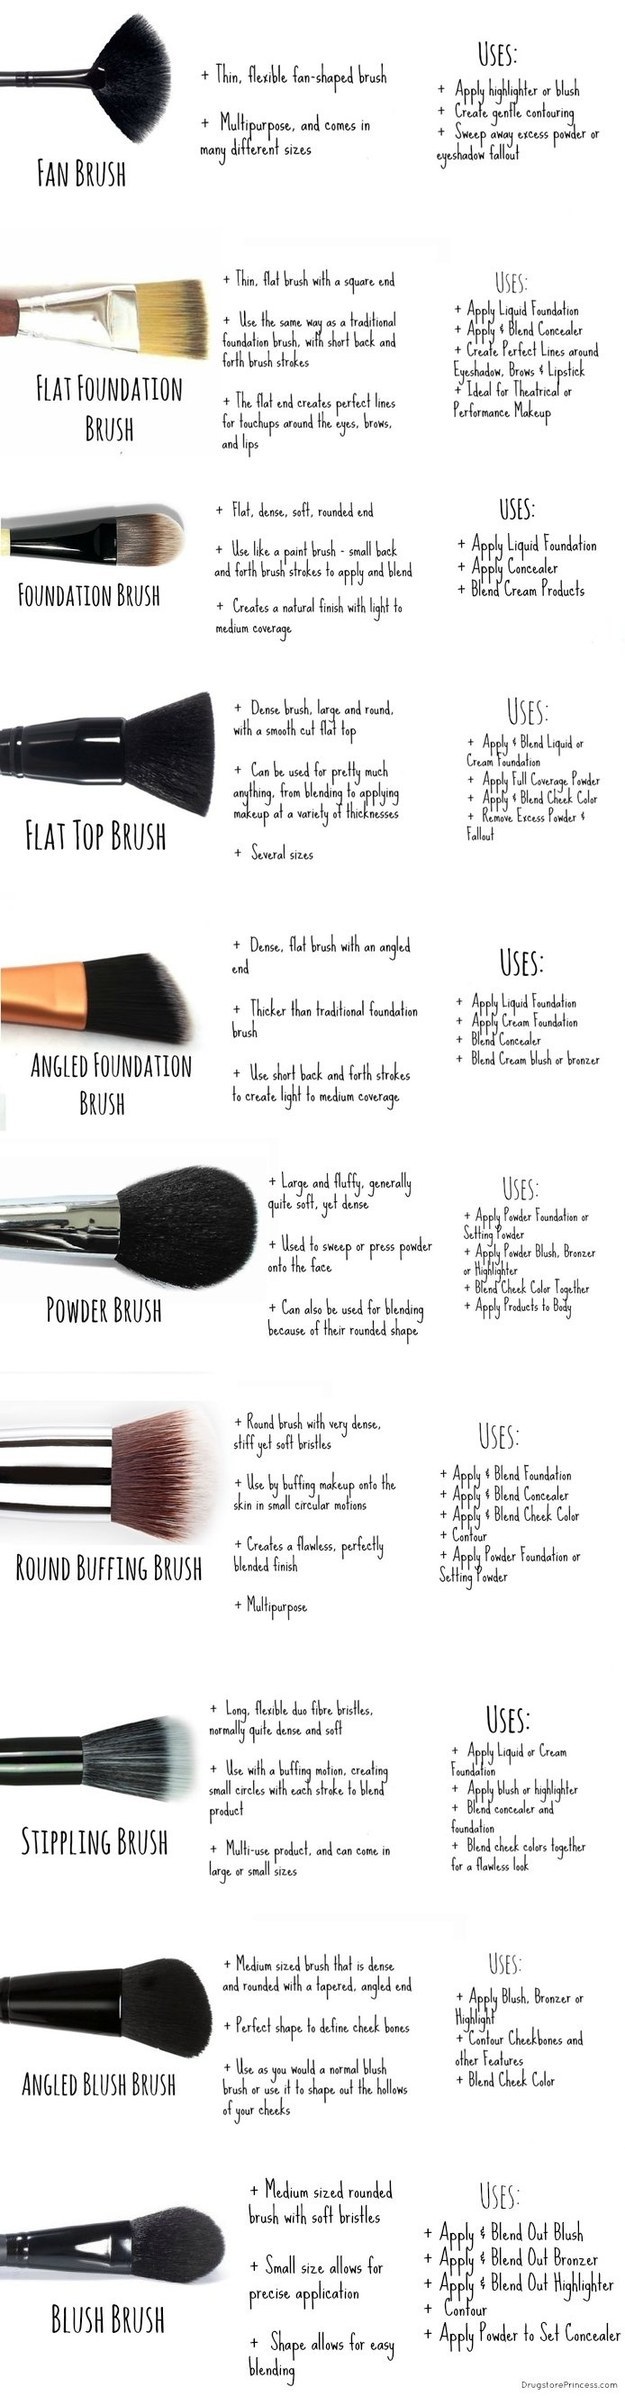
Using the right tools will instantly up your makeup game.
2. So do eyeshadow brushes.
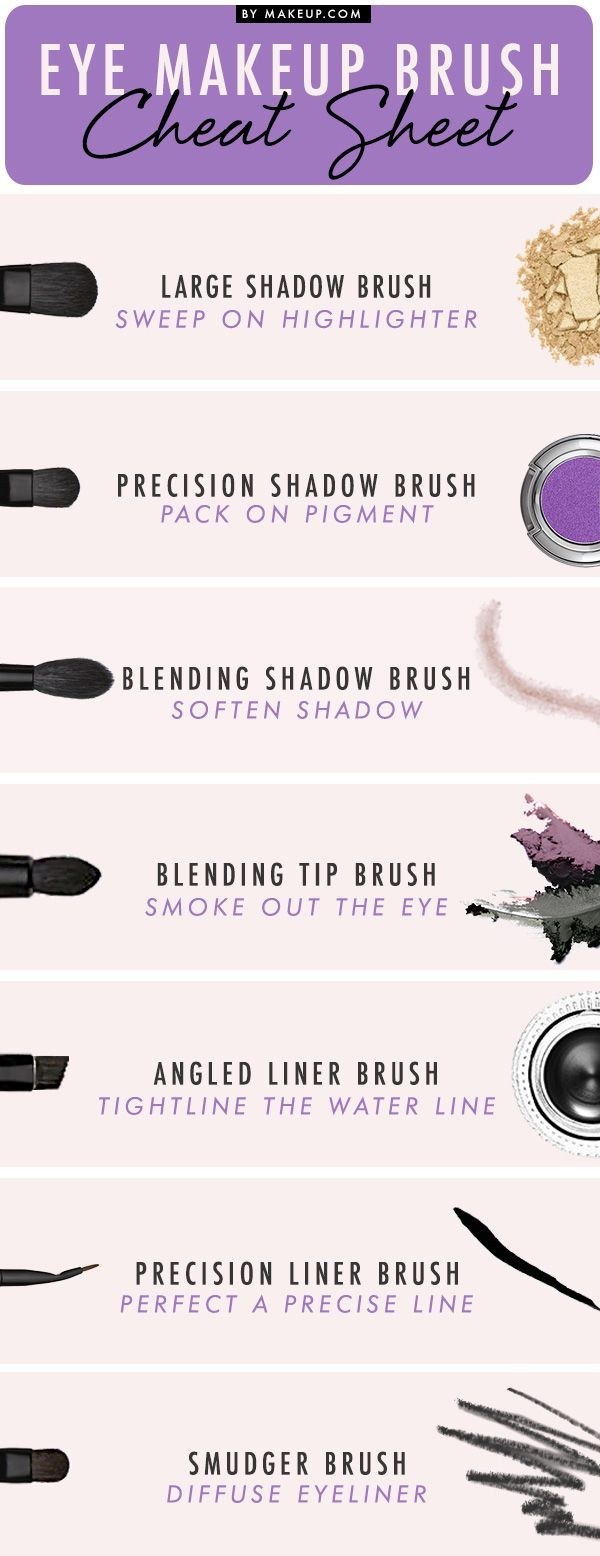
It takes a village for a good smokey eye.
3. And here’s how to actually clean all of those brushes.

Grab either a professional cleaner or baby shampoo to get rid of old makeup and bacteria that’s been chilling in your brushes. It’s best to wash them about once every two weeks.
4. Maybe you’re more of a sponge person. Here’s how to clean those.
When you realize that sponges literally soak up all of the makeup, face oils, and bacteria that go into them, you start to understand how necessary it is to clean them.
5. Concealers and color correctors come in all kinds of shades. This chart shows what they actually do.
Concealer palettes often come with a range of different shades for specific purposes. This chart details exactly how to utilize each of those colors.
6. Knowing your undertone will help you find makeup colors that really suit you.
Once you learn your undertone, you’ll be way more prepared to choose makeup colors that work for you. For example, a red lipstick with warm undertones (orange or yellow) works best for warm skin tones, while red lipstick with cool undertones (blue or purple) works best on cool skin tones. It’s science!
7. Finding the perfect foundation for your skin type is made easy with this chart.
Keep in mind that the ideal foundation for your skin can change from season to season, too.
8. Having a ton of products means you may be unsure about when to use each one.
Cleanser, serum, moisturizer, primer, foundation, concealer, powder, bronzer, blush, highlight. Cool? Cool.
9. When you’ve got a massive pimple that needs concealing, follow these steps.
Start with a gel moisturizer, then use concealer, foundation, and powder in that order.
10. Contouring and highlighting really just takes some good placement.
This may seem intimidating, but once you see where you should place a contour color versus where you should apply a highlighter, you’ll be able to sleep at night. Just remember to blend.
11. Or you could go simple with just a dusting of bronzer.
Basically, apply bronzer where the sun naturally hits your face.
12. When you’re applying blush, consider the shape of your face.
Everyone’s got apples, but that means something different on every face.
13. If your powder makeup cracks, you can save it with rubbing alcohol.
Put all of the little pieces of cracked makeup into your compact. Then, pour a few drops of rubbing alcohol into the tin and mix together with your finger. Let the compact dry overnight and it’ll be ready for action come morning.
14. Before you apply lipstick, exfoliate your lips with this easy DIY scrub.
Use your finger or a toothbrush to rub this mixture on your lips in tiny, circular motions for about 30 seconds. Then rinse it off with water and a tissue. Smoother lips means smoother lipstick which makes everything look better.
15. Use this powder trick to make your lipstick last forever (or at least until you want to take it off at night).
Apply the lipstick with a brush or straight from the tube. Blot, then cover your lips with a translucent powder, which soaks up the moisture of lipstick that can make it slide or bleed. Put on one more layer of lipstick to seal in the powder, and that stuff will not move.
16. Or, make use of your concealer and lip liner to make your lips look fuller.
Use a lip liner one shade deeper than your natural color to line just outside of your lips. Fill the center with concealer, then apply lipstick on top, then lip gloss. Become one with your inner Kylie Jenner.
17. When you’re shaping your eyebrows, keep in mind these three angles.
Your brow should start in line with the end of your nose, arch about two thirds of the way through the brow, and end in line with the outermost portion of your eye.
18. False eyelashes are kind of terrifying if you don’t know how to apply them properly.
Using tweezers is the only way false eyelashes can really work.
19. Or, you could go the daily route with mascara. Here’s how to make your lashes look extra long and thick.
Heating up your eyelash curler with your blow dryer is like using a curling wand on your hair.
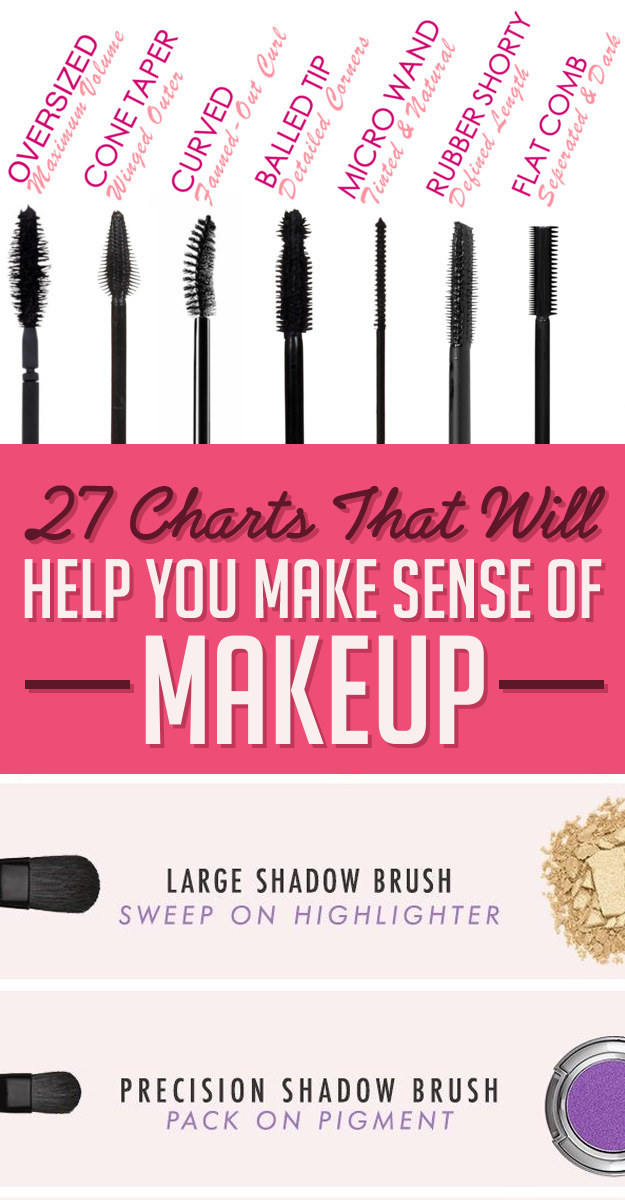
20. No matter how you do your lashes, first make sure you’re using the right type of wand for what you want.
In the end, if you want a few of these benefits, you can always use a few different wands for a mascara cocktail.
21. Everyone has a different eye shape. Check out this chart for the best way to apply makeup for your eyes.
Smokey eye makeup works best when you customize it for your eye shape.
22. Winged eyeliner is a whole lot easier with this trick.
To get the perfect flick in Step 1, hold your eyeliner diagonally on your face from the corner of your nostril up to the corner of your eye. Where the pencil hits at your eye will be the perfect angle for you.
23. Or, you could tightline your eyes instead.
The biggest difference between regular lining and tightlining is the visible space of eyelid between your lashes and your eye.
24. Follow these steps for a really clean manicure at home.
The main takeaways: Push back your cuticles, but avoid cutting them; wipe off excess polish from your brush so that you can cover the whole nail without double-dipping; make light brush strokes to fill your nail.
25. No one can really paint their nails without mistakes, so this acetone and paint brush trick really works.
Grab an angled eyeshadow brush (make sure it’s one you no longer use on your eyes) and dip it in nail polish remover. Gently use that to get rid of any extra polish on your cuticles.
26. Instead of suffering ripped cotton balls and endless frustration, remove glitter nail polish with some acetone, cotton, and tin foil.
Soak a cotton pad in acetone, then place it over your nail. Wrap your nail in tin foil so the cotton pad stays in place, then repeat on the rest of your nails. Let them soak for about 10 minutes, then pull off the cotton ball and bask in the happiness that is a non-aggravating glitter nail polish removal.
27. Finally, keep in mind it may be time to start tossing some of the products in your makeup bag.
Using expired products means a higher risk of infection. No one needs that in their life.
Original article and pictures take http://www.buzzfeed.com/augustafalletta/27-charts-that-will-help-you-make-sense-of-makeup?utm_term=.lhPvbQKGY&sub=3674351_5008032 site
Комментариев нет:
Отправить комментарий